
Page 4 - lw3365
P. 4
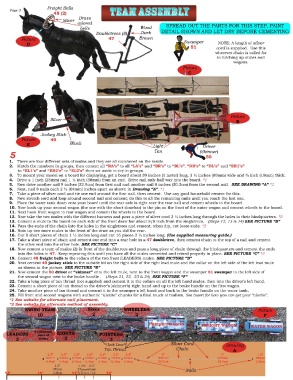
SPREAD OUT THE PARTS FOR THIS STEP, PAINT
                                                                    DETAIL SHOWN AND LET DRY BEFORE CEMENTIN

                                                                                            NOTE:  A length of silver
                                                                                           cord is supplied.  Use this
                                                                                           wherever chain is called for
                                                                                            in hitching up mules and
                                                                                                  wagons.


     5
     1.  There are four different sets of mules and they are all numbered on the inside.
     2.  Match the numbers in groups, then cement all "RA's" to all "LA's" and "BR's" to "BL's", "DR's" to "DL's" and "ERl's"
         to "ELl's" and "ER2's" to "EL2's" then set aside to dry in groups.
     3.  To mount your model on a  board for displaying, get a  board about 39 inches ( 1 meter) long, 3  ½ inches (89mm) wide and ¾  inch ( 19mm) thick.
     4.  Drive a  1 inch (25mm) nail 1  ½ inch (38mm) from an end.  Drive nail only halfway into the board.  *l
     5.  Now drive another nail 9  inches (22.9cm) from first nail and another nail 8  inches (20.3cm) from the second nail.  SEE DRAWING "A" *l
     6.  Next, nail 8  nails each 2  ½  (64mm) inches apart as shown in Drawing "A".  *l
     7.  Take a  piece of silver cord and tie one end around the first nail, then cement.  Use any good household cement for this.
     8.  Now stretch cord and loop around second nail and cement; do this to all the remaining nails until you reach the last one.
     9.  Place the water tank down onto your board until the rear axle is right over the rear nail and cement wheels to the board.
     10.  Now hook up your second wagon (the one with the short drawbar) to the pin on the front of the water wagon and cement wheels to the board.
     11.  Next hook front wagon to rear wagon and cement the wheels to the board.
     12.  Now take the two mules with the different harness and pass a  piece of silver cord 2  ¼ inches long through the holes in their hindquarters.  *2
     13.  Cement a  mule to the board on each side of the front draw bar about 5 / 8  inch from the singletrees.  (Steps  12,  13 &  14) SEE PICTURE "B"
     14.  Pass the ends of the chain into the holes in the singletrees and cement; when dry, cut loose ends.  *2
     15.  Rein up two more mules to the front of the draw as you did the rear.
     16.  Cut 8  short pieces of chain  1 ½  inches long and cut 16 pieces 2  ½  inches long. (Use supplied measuring guide.)
     17.  Take a  short piece of chain and cement one end into a  rear hole in a  47 doubletree, then cement chain to the top of a  nail and cement
         the other end into the other hole.  SEE PICTURE "C"
     18.  Now cement a  team of mules (2)  in front of the doubletrees and pass a  long piece of chain through the hindquarters and cement the ends
         into the holes in 47.  Keep repeating this until you have all the mules cemented and reined properly in place.  SEE PICTURE "C" *2
     19.  Cement 48 freight bells to the collars of the two front (LEADERS) mules.  SEE PICTURE "D"
     20.  Next cement 49 jockey stick to the outside bit on the right side of the right lead mule and the collar on the left side of the left lead mule
         as shown in the picture.  SEE PICTURE "E"
     21.  Now cement the 50 driver or "skinner" onto the left mule, next to the front wagon and the swamper 51 swamper to the left side of
         the second wagon next to the brake handle.   (Steps 21, 22,  23 & 24)  SEE PICTURE "F"
     22.  Take a  long piece of tan thread (not supplied) and cement it to the collars on all the left hand mules, then into the driver's left hand.
     23.  Cement a  short piece of tan thread to the driver's (skinner's) right hand and up to the brake handle on the first wagon.
     24.  Take another piece of tan thread and cement it to the swamper's left hand and back to the brake handle on the water tank.
     25.  Fill front and second wagons with authentic "ulexite" chunks for a  final touch of realism.  See insert for how you can get your "ulexite".
     * 1  See website for alternate nail placement.
     *2 See website.for alternate method of assembly.


                                                                        Silver Cord
                                                              /4 i          hain
                     2.~   2.~   2~   2.~   2~   2.~
                   •  64mm  - 64mm - 64mm  - 64mm - 64mm - 64mm - 64mm -        _           229mm         -
                    6  4cm  - 6  4cm - 6  4cm  - 6  4cm  - 6  4cm  - 6  4cm - 6  4cm  - ~  O 3cm   •t   ~  2  9cm   -
                        1.5"      2.25"  2.5"
                       38mm      57mm 64mm                                    Nails
                 !.!l"   3.8cm   !!.!l" 5.7cm 6.4cm   !l.ll"