
Page 2 - lw3365
P. 2
Page 1
1
SPREAD OUT THE PARTS FOR
THIS STEP.
* PAINT DETAIL SHOWN AND
LET DRY BEFORE CEMENTING.
1. Cement 1 & 2 to 3 .
2. Cement 4R to 3 , 1 & 2 .
3. Cement 5 to 4R.
4. Now cement 6L to 3 , 1 & 2 .
Also, cement 5 to inside of 6L.
5. Finally, cement 7 & 8 to 6L,
now set aside to dry.
MAKE TWO OF THESE
See website for alternate method of
assembly.
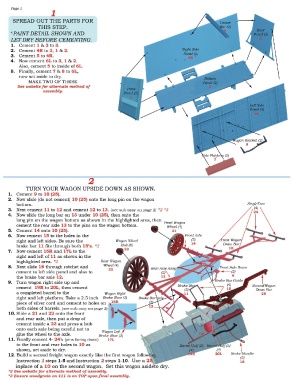
2
TURN YOUR WAGON UPSIDE DOWN AS SHOWN.
1. Cement 9 to 10 (25).
2. Now slide (do not cement) 10 (25) onto the long pin on the wagon
bottom.
3. Next cement 11 to 12 and cement 12 to 13. (see sub assy on page 2) *2 *3
4. Now slide the long bar on 13 under 10 (25), then onto the
long pin on the wagon bottom as shown in the highlighted area, then
cement the rear axle 13 to the pins on the wagon bottom.
5. Cement 14 onto 10 (25).
6. Now cement 15 to the holes in the
right and left sides. Be sure the Wagon Wheel
brake bar 11 fits through both 15's. *2 Hub (8)
23
7. Now cement 16R and 17L to the
right and left of 11 as shown in the
highlighted area. *2 Rear Wagon
Wheel (4)
8. Next slide 18 through ratchet and
22
cement to left side panel and also to
the brake bar axle 12. t
9. Turn wagon right side up and
Second Wagon
cement 19R to 20L, then cement
Draw Bar
a completed barrel to the 25
right and left platform. Take a 2.5 inch Brake Shoe (2)
piece of silver cord and cement to holes on
both sides of barrels. (see sub assy on page 2)
10. Slide a 21 and 22 onto the front
and rear axle, then put a drop of
cement inside a 23 and press a hub
onto each axle being careful not to Wagon Left
glue the wheel to the axle. Brake Shoe (2)
11. Finally cement 4- 24's (pins facing down) 17L
to the front and rear holes in 10 as
shown, set aside to dry.
12. Build a second freight wagon exactly like the first wagon followin
Instruction 1 steps 1-5 and Instruction 2 steps 1-10. Use a 2
inplace of a 10 on the second wagon. Set this wagon asideto dry.
*2 See website for alternate method of assembly.
*3 Ensure woodgrain on #11 is on TOP upon final assembly.